|
|
|
|
Products mentioned in this Article
--None--
|
|
|
|
|
|
|
|
|
 |
|
|
 |
Multi-Media Models: Part One
Plastic Components
with Evan Allen
With the recent release of the new plastic Panther series and Panzer IV Ausf J track and components sprues it’s a really good time to look at what’s involved in assembling and even modifying multimedia kits and models. You’ll be pleased to hear that these are just the first in another bunch of new sets that will be making an appearance over the next wee while, and all of them are designed to make your life a little bit easier and give you even better detailed models along with plenty of choice. The one piece plastic tracks, with more and better detail than the metal ones, are possible due to the use of slide tool technology where multi part steel mould tools can create three-dimensional details without having to resort to using a bunch of smaller and fiddlier bits glued together instead.
Learn more about the Master Modeller, Evan Allen here...
Left: Evan, kicking it old skool.
|
|
The plastic sprues also mean you won’t have the
need to sometimes get rid of excess metal flashing, sort miscast parts
or even have the odd missing piece. The ability to modify and even make
scratch-built models will be enhanced as some enterprising modellers
have already shown is possible with a little thought.
Learn more about the Panzer IV J here...
Right: The Panzer IV Ausf J assembled using the new plastic components.
|
 |
Below: The plastic Panzer IV Ausf J track sprue.
|
Below: The plastic Panzer IV Ausf J Components sprue.
|
 |
 |
 |
Add the heft and
crisp detail of the resin hull and turret components and you end up with
great gaming models with plenty of opportunity to add detail and
personalise them. Drilling out the plastic gun barrel ends and exhaust
pipes are just some of the enhancements made even easier for example,
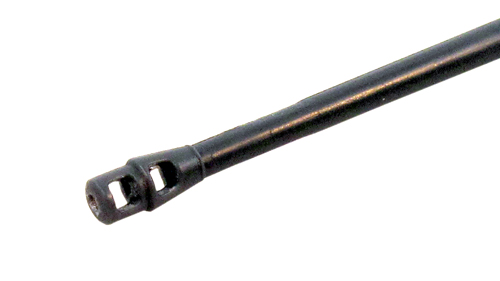
such simple things but very effective visually.
Left: An example of a drilled out muzzle brake on the 7.5cm KwK42 gun of the Panther.
|
Plastic Parts
Plastic doesn’t mean though that there is no need
for checking and clean up of parts. It always pays to make sure you
use clean sharp tools for working with plastic as blunt cutting tools
will make a mess of even hard polystyrene plastic, and are more
dangerous to you the gamer and modeller.
Right: Tools of the plastic modelling trade. |

|
| Tip: Don’t throw away the plastic sprue
once the components have been removed, you can use the old candle trick
to make radio aerial lengths that will be bendy and almost
indestructible. Also lengths of the sprue can be used for jobs such as
support the Panzer IV Schürzen to help give some extra strength hidden
away underneath. The left over sprue is very handy to have around for
all sorts of odd jobs. |
 |
I’d recommend you use a side
cutter to remove components from their frames to help reduce the clean
up required, and they’re safer and quicker than a knife.There will sometimes be slight mould lines that are easy to clean off by scraping a sharp knife blade held at 90 degrees to the plastic part gently along the surface, this will shave off any slight raised lines but be careful not to remove any detail! It’s better to do this in several, gentle, runs rather than risk pressing too hard first time round. This technique will also clean up the sprue attachment points where the plastic flows through the mould tool after you’ve removed the parts from the sprue.
Left: Using a hobby knife to gently remove any mould lines.
|
Tip: When drilling plastic, or any material for that matter, always make a guide or pilot hole first to stop the drill bit from moving from where you want it. Sometimes a small knick with the end of a knife blade is all you need, and cover the surrounding area with a piece of masking tape so that if you do slip then you won’t mark the surface. The masking tape will also help stop resin from breaking or shattering when being gently drilled out – especially useful if you need to drill out some extra magnet holes.
|
| Below: Drilling a pilot hole for a rare-earth magnet. |
Below: Drilling the correct hole size for the magnet. |
 |
 |
| After clean up, and before any glue is used,
always, always check fit the parts to be joined and make yourself
satisfied that the fit looks how it should, you’ve got the correct
orientation and the right part is being used! And also think about the
next step or part in the sequence to be added – is any other adjustment
required? Once you’re happy then it’s time to add glue, proper
polystyrene cement is the best choice for hard plastic to hard plastic
joints and it will literally melt and weld the parts together so be
careful how much you use! It can also be a bit fumy too so some
ventilation is a good idea. |
| Below: The importance of dry fitting components before final assembly cannot be stated enough. |

|

|
| Tip: Have some Blu-Tac or tape handy to help
hold parts in place while the glue sets, even use some of the plastic sprue
frame to help keep things aligned and stop them from moving. |
| Below: Using Blu-Tac to hold the side shields of the Möbelwagon in place while the hobby glue cures. |
 |
 |
Last Updated On Thursday, August 23, 2012 by Blake at Battlefront
|
|
|